|
片段(Fragments)是一个应用程序的用户界面或行为活动,使活动更加模块化设计,可以放置在一块。一个片段是一种子活动。以下要点有关片段:
-
片段都有自己的布局和规范自己的行为与生命周期回调。
-
可以添加或删除片段在活动而活动运行。
-
可以将多个片段在一个单一的活动,建立一个多窗格UI。
-
片段可用于多种活动。
-
片段的生命周期是密切相关,其主机活动的生命周期,表示当活动暂停时,所有的片段也将停止活动。
-
片段可以实现的行为当没有用户界面组件。
-
片段加入被加入到 Android API 在Honeycomb版本的Android(API版本11)。
创建片段可以扩展Fragment?类并在活动的布局文件中声明片段,可以插入到活动布局的一个片段到<fragment>元素。
介绍片段之前,有一个限制,因为可以在一个特定的时间点,屏幕上只显示单个活动。所以不能够分割设备屏幕来分别控制不同部位。但随着引进片段得到了更多的灵活性,并在屏幕上同一时时间可以将一个单一的活动取消限制。现在有一个单一的acitivity?,但每个acitivity?可以包括多个片段,它们有自己的布局,活动和完整的生命周期。
下面是一个典型的例子,两个UI模块定义的片段可以组合成平板电脑的设计的一个活动,这里在手机中设计分离。
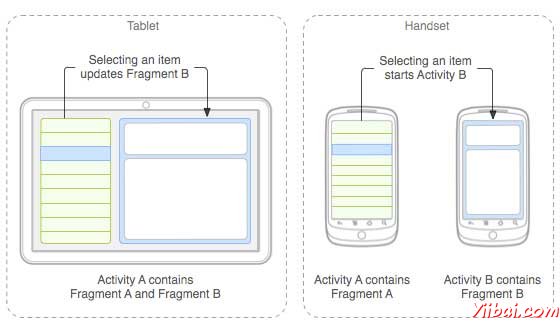
应用程序嵌入活动A中两个片段,在一个平板大小的设备上运行。然而在手机大小的屏幕上,有两个片段有足够的空间,所以Activity A包括片段物品的清单,当用户选择一篇文章时,它开始使用Activity B,包括阅读第二片段的文章。
片段生命周期
Android 的碎片有自己的生命周期,非常相似 Android 中的 Activity 。本节主要阐述其生命周期在不同阶段。
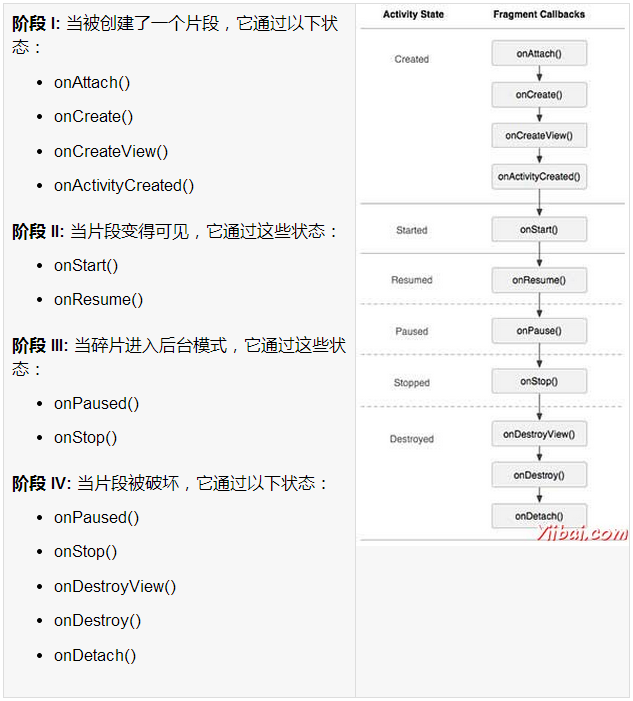
如何使用碎片?
这里演示简单的步骤来创建碎片:
-
首先,要决定有多少碎片要在活动中要使用。例如,要使用两个片段处理设备的横向和纵向模式。
-
在下一页的碎片数量的基础上,创建类将扩展?Fragment?类。上述片段类的回调函数。可以根据要求覆盖所有的功能。
-
对应每一个片段,需要在XML文件中创建布局。这些文件将根据布局来定义碎片。
-
最后修改活动文件替换片段,根据需要来定义实际的逻辑。
这里是重要的 覆盖在Fragment?类的方法,如下列表:
-
onCreate()?系统调用时创建片段。初始化片段要保留暂停或停止时的片段,然后恢复其它组成部分。
-
onCreateView()?当片段第一次绘制用户界面时,系统调用这个回调。要绘制一个UI为片段,必须返回一个 View 组件,此方法是片段的根布局。返回空片段不提供一个UI。
-
onPause()?系统调用此方法,作为第一次指示用户离开此片段。这通常是提交更改操作,持久化时间超过当前用户会话时间。
例子
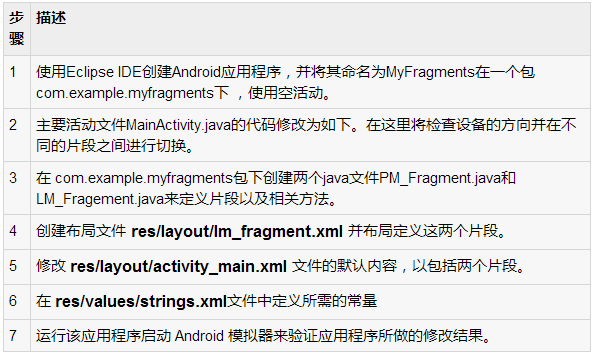
下面的这个例子将解释如何创建片段 - Fragments。在这里将创建两个片段并且当其中一个使用的设备是在横向模式下,另一个片段将被用在纵向模式下。按照下面的步骤类似于在前面创建的Hello World范例:
以下是主要活动文件的内容 src/com.example.mycontentprovider/MainActivity.java 修改
package com.example.myfragments;
    import android.os.Bundle;
    import android.app.Activity;
    import android.app.FragmentManager;
    import android.app.FragmentTransaction;
    import android.content.res.Configuration;
    import android.view.WindowManager;
    public class MainActivity extends Activity {
     @Override
     protected void onCreate(Bundle savedInstanceState) {
          super.onCreate(savedInstanceState);
          Configuration config = getResources().getConfiguration();
          FragmentManager fragmentManager = getFragmentManager();
          FragmentTransaction fragmentTransaction =
          fragmentManager.beginTransaction();
          /**
         * Check the device orientation and act accordingly
         */
         if (config.orientation == Configuration.ORIENTATION_LANDSCAPE) {
           /**
           * Landscape mode of the device
           */
           LM_Fragment ls_fragment = new LM_Fragment();
           fragmentTransaction.replace(android.R.id.content, ls_fragment);
        }else{
           /**
           * Portrait mode of the device
           */
           PM_Fragment pm_fragment = new PM_Fragment();
           fragmentTransaction.replace(android.R.id.content, pm_fragment);
        }
        fragmentTransaction.commit();
     }
} |
创建两个的片段文件LM_Fragement.java 和 PM_Fragment.java在com.example.mycontentprovider 包下。
以下是LM_Fragement.java文件的内容 :
package com.example.myfragments;
    import android.app.Fragment;
    import android.os.Bundle;
    import android.view.LayoutInflater;
    import android.view.View;
    import android.view.ViewGroup;
    public class LM_Fragment extends Fragment{
       @Override
       public View onCreateView(LayoutInflater inflater,
          ViewGroup container, Bundle savedInstanceState) {
        /**
         * Inflate the layout for this fragment
         */
        return inflater.inflate(
        R.layout.lm_fragment, container, false);
     }
} |
下面是 PM_Fragement.java 文件的内容:
package com.example.myfragments;
    import android.app.Fragment;
    import android.os.Bundle;
    import android.view.LayoutInflater;
    import android.view.View;
    import android.view.ViewGroup;
    public class PM_Fragment extends Fragment{
       @Override
       public View onCreateView(LayoutInflater inflater,
          ViewGroup container, Bundle savedInstanceState) {
        /**
         * Inflate the layout for this fragment
         */
        return inflater.inflate(
        R.layout.pm_fragment, container, false);
     }
} |
创建两个布局文件 lm_fragement.xml 和 pm_fragment.xml 在目录 res/layout 下。
以下是 lm_fragement.xml 文件的内容:
<?xml version="1.0" encoding="utf-8"?>
     <LinearLayout
     xmlns:android="http://schemas.android.com/apk/res/android"
     android:orientation="vertical"
     android:layout_width="fill_parent"
     android:layout_height="fill_parent"
     android:background="#7bae16">
     <TextView
     android:layout_width="fill_parent"
     android:layout_height="wrap_content"
     android:text="@string/landscape_message"
     android:textColor="#000000"
     android:textSize="20px" />
    <!-- More GUI components go here  -->
</LinearLayout> |
以下是 pm_fragment.xml 文件的内容:
<?xml version="1.0" encoding="utf-8"?>
     <LinearLayout
     xmlns:android="http://schemas.android.com/apk/res/android"
     android:orientation="horizontal"
     android:layout_width="fill_parent"
     android:layout_height="fill_parent"
     android:background="#666666">
     <TextView
     android:layout_width="fill_parent"
     android:layout_height="wrap_content"
     android:text="@string/portrait_message"
     android:textColor="#000000"
     android:textSize="20px" />
    <!-- More GUI components go here  -->
</LinearLayout> |
下面 res/layout/activity_main.xml 文件的内容,其中包括片段:
<?xml version="1.0" encoding="utf-8"?>
    <LinearLayout xmlns:android="http://schemas.android.com/apk/res/android"
      xmlns:tools="http://schemas.android.com/tools"
      android:layout_width="fill_parent"
      android:layout_height="fill_parent"
      android:orientation="horizontal">
    <fragment
     android:name="com.example.fragments"
     android:id="@+id/lm_fragment"
     android:layout_weight="1"
     android:layout_width="0dp"
     android:layout_height="match_parent" />
    <fragment
     android:name="com.example.fragments"
     android:id="@+id/pm_fragment"
     android:layout_weight="2"
     android:layout_width="0dp"
     android:layout_height="match_parent" />
</LinearLayout> |
确保 res/values/strings.xml 文件有以下内容:
<?xml version="1.0" encoding="utf-8"?>
    <resources>
        <string name="app_name">MyFragments</string>
        <string name="action_settings">Settings</string>
        <string name="hello_world">Hello world!</string>
        <string name="landscape_message">This is Landscape mode fragment
        </string>
        <string name="portrait_message">This is Portrait mode fragment
        </string>
</resources> |
现在试着来运行 MyFragments 刚刚创建的应用程序。假设创建AVD,同时做好了环境设置。要从Eclipse运行应用程序,首先打开一个项目的活动文件,从工具栏上单击“Run”? 图标。 Eclipse AVD 安装应用程序,并启动它,如果设置和应用都没有问题,它会显示仿真器窗口,看到如下窗口,点击"MENU" 按钮。可能需要点耐心,因为它可能需要一段时间(提示:取决于你的电脑速度了): 图标。 Eclipse AVD 安装应用程序,并启动它,如果设置和应用都没有问题,它会显示仿真器窗口,看到如下窗口,点击"MENU" 按钮。可能需要点耐心,因为它可能需要一段时间(提示:取决于你的电脑速度了):
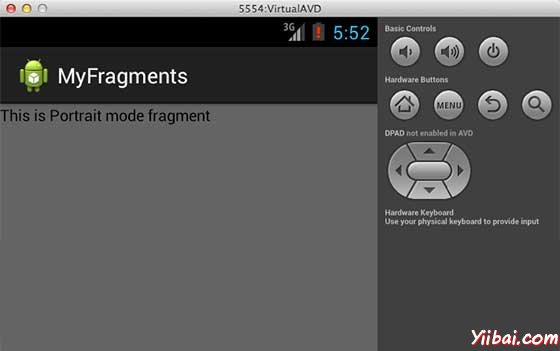
要改变模式,模拟器的屏幕,可以做以下操作:
-
fn+control+F11?Mac上改变的风景,图像,反之亦然。
-
ctrl+F11?在Windows.
-
ctrl+F11?在?Linux.
改变了模式以后,能够看到的图形用户界面,如下已经实现了横向模式:
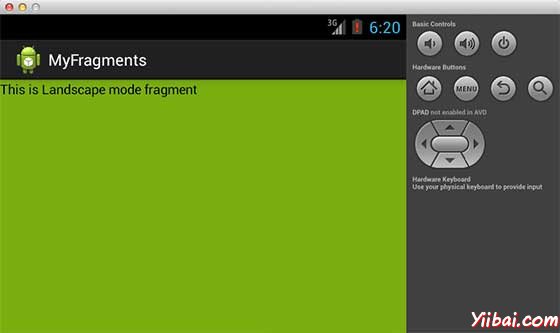
这样就可以使用相同的活动,但不同的GUI要通过不同的片段。根据要求可以使用不同类型的GUI组件来创建不同的GUI。
|
